//
// ViewController.swift
// CoreImage018
//
import UIKit
import CoreImage
class ViewController: UIViewController {
// 画像.
let myInputImage = CIImage(image: UIImage(named: "sample1")!)
// ImageView.
var myImageView: UIImageView!
// ボタン.
let myButton: UIButton = UIButton()
override func viewDidLoad() {
super.viewDidLoad()
//UIImageViewの生成
myImageView = UIImageView(frame: CGRect(x: 0, y: 0, width: 350, height: 600))
myImageView.image = UIImage(ciImage: myInputImage!)
self.view.addSubview(myImageView)
// ボタン.
myButton.frame = CGRect(x: 0, y: 0, width: 80, height: 80)
myButton.backgroundColor = UIColor.black
myButton.layer.masksToBounds = true
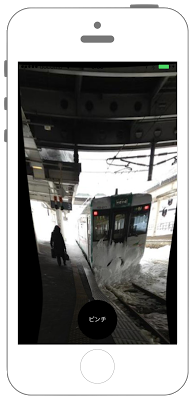
myButton.setTitle("ピンチ", for: UIControl.State.normal)
myButton.titleLabel?.font = UIFont.systemFont(ofSize: UIFont.smallSystemFontSize)
myButton.setTitleColor(UIColor.white, for: UIControl.State.normal)
myButton.layer.cornerRadius = 40.0
myButton.layer.position = CGPoint(x: self.view.frame.width/2, y:self.view.frame.height - 50)
myButton.tag = 1
myButton.addTarget(self, action: #selector(ViewController.onClickMyButton(sender:)), for: .touchUpInside)
// 背景色を黒.
self.view.backgroundColor = UIColor.black
// UIボタンをViewに追加
self.view.addSubview(myButton);
}
/*
ボタンイベント
*/
@objc func onClickMyButton(sender: UIButton){
//カラーエフェクトを指定してCIFilterをインスタンス化
let myPinchDistortionFilter = CIFilter(name: "CIPinchDistortion")
// 中心をセット.
myPinchDistortionFilter!.setValue(CIVector(cgPoint: CGPoint(x: self.view.frame.width/2, y: self.view.frame.height/2)), forKey: "inputCenter")
//イメージのセット
myPinchDistortionFilter!.setValue(myInputImage, forKey: kCIInputImageKey)
//フィルターを通した画像をアウトプット
let myOutputImage : CIImage = myPinchDistortionFilter!.outputImage!
// 再びUIViewにセット.
myImageView.image = UIImage(ciImage: myOutputImage)
// 再描画.
myImageView.setNeedsDisplay()
}
override func didReceiveMemoryWarning() {
super.didReceiveMemoryWarning()
}
}
//
//  ViewController.swift
//  CoreImage018
//

import UIKit
import CoreImage

class ViewController: UIViewController {

    // 画像.
    let myInputImage = CIImage(image: UIImage(named: "sample1")!)

    // ImageView.
    var myImageView: UIImageView!

    // ボタン.
    let myButton: UIButton = UIButton()

    override func viewDidLoad() {
        super.viewDidLoad()

        //UIImageViewの生成
        myImageView = UIImageView(frame: CGRect(x: 0, y: 0, width: 350, height: 600))
        myImageView.image = UIImage(ciImage: myInputImage!)
        self.view.addSubview(myImageView)

        // ボタン.
        myButton.frame = CGRect(x: 0, y: 0, width: 80, height: 80)
        myButton.backgroundColor = UIColor.black
        myButton.layer.masksToBounds = true
        myButton.setTitle("ピンチ", for: UIControlState.normal)
        myButton.titleLabel?.font = UIFont.systemFont(ofSize: UIFont.smallSystemFontSize)
        myButton.setTitleColor(UIColor.white, for: UIControlState.normal)
        myButton.layer.cornerRadius = 40.0
        myButton.layer.position = CGPoint(x: self.view.frame.width/2, y:self.view.frame.height - 50)
        myButton.tag = 1
        myButton.addTarget(self, action: #selector(ViewController.onClickMyButton(sender:)), for: .touchUpInside)

        // 背景色を黒.
        self.view.backgroundColor = UIColor.black

        // UIボタンをViewに追加
        self.view.addSubview(myButton);
    }

    /*
     ボタンイベント
     */
    @objc func onClickMyButton(sender: UIButton){

        //カラーエフェクトを指定してCIFilterをインスタンス化
        let myPinchDistortionFilter = CIFilter(name: "CIPinchDistortion")

        // 中心をセット.
        myPinchDistortionFilter!.setValue(CIVector(cgPoint: CGPoint(x: self.view.frame.width/2, y: self.view.frame.height/2)), forKey: "inputCenter")

        //イメージのセット
        myPinchDistortionFilter!.setValue(myInputImage, forKey: kCIInputImageKey)

        //フィルターを通した画像をアウトプット
        let myOutputImage : CIImage = myPinchDistortionFilter!.outputImage!

        // 再びUIViewにセット.
        myImageView.image = UIImage(ciImage: myOutputImage)

        // 再描画.
        myImageView.setNeedsDisplay()

    }

    override func didReceiveMemoryWarning() {
        super.didReceiveMemoryWarning()
    }
}
//
//  ViewController.swift
//  CoreImage018
//
//  Created by Misato Morino on 2016/09/19.
//  Copyright © 2016年 Misato Morino. All rights reserved.
//

import UIKit
import CoreImage

class ViewController: UIViewController {

    // 画像.
    let myInputImage = CIImage(image: UIImage(named: "sample1")!)

    // ImageView.
    var myImageView: UIImageView!

    // ボタン.
    let myButton: UIButton = UIButton()

    override func viewDidLoad() {
        super.viewDidLoad()

        //UIImageViewの生成
        myImageView = UIImageView(frame: CGRect(x: 0, y: 0, width: 350, height: 600))
        myImageView.image = UIImage(ciImage: myInputImage!)
        self.view.addSubview(myImageView)

        // ボタン.
        myButton.frame = CGRect(x: 0, y: 0, width: 80, height: 80)
        myButton.backgroundColor = UIColor.black
        myButton.layer.masksToBounds = true
        myButton.setTitle("ピンチ", for: UIControlState.normal)
        myButton.titleLabel?.font = UIFont.systemFont(ofSize: UIFont.smallSystemFontSize)
        myButton.setTitleColor(UIColor.white, for: UIControlState.normal)
        myButton.layer.cornerRadius = 40.0
        myButton.layer.position = CGPoint(x: self.view.frame.width/2, y:self.view.frame.height - 50)
        myButton.tag = 1
        myButton.addTarget(self, action: #selector(ViewController.onClickMyButton(sender:)), for: .touchUpInside)

        // 背景色を黒.
        self.view.backgroundColor = UIColor.black

        // UIボタンをViewに追加
        self.view.addSubview(myButton);
    }

    /*
     ボタンイベント
     */
    func onClickMyButton(sender: UIButton){

        //カラーエフェクトを指定してCIFilterをインスタンス化
        let myPinchDistortionFilter = CIFilter(name: "CIPinchDistortion")

        // 中心をセット.
        myPinchDistortionFilter!.setValue(CIVector(cgPoint: CGPoint(x: self.view.frame.width/2, y: self.view.frame.height/2)), forKey: "inputCenter")

        //イメージのセット
        myPinchDistortionFilter!.setValue(myInputImage, forKey: kCIInputImageKey)

        //フィルターを通した画像をアウトプット
        let myOutputImage : CIImage = myPinchDistortionFilter!.outputImage!

        // 再びUIViewにセット.
        myImageView.image = UIImage(ciImage: myOutputImage)

        // 再描画.
        myImageView.setNeedsDisplay()

    }

    override func didReceiveMemoryWarning() {
        super.didReceiveMemoryWarning()
    }
}
//
//  ViewController.swift
//  CoreImage018
//
//  Created by Misato Morino on 2016/09/19.
//  Copyright © 2016年 Misato Morino. All rights reserved.
//

import UIKit
import CoreImage

class ViewController: UIViewController {

    // 画像.
    let myInputImage = CIImage(image: UIImage(named: "sample1")!)

    // ImageView.
    var myImageView: UIImageView!

    // ボタン.
    let myButton: UIButton = UIButton()

    override func viewDidLoad() {
        super.viewDidLoad()

        //UIImageViewの生成
        myImageView = UIImageView(frame: CGRectMake(0, 0, 350, 600))
        myImageView.image = UIImage(CIImage: myInputImage!)
        self.view.addSubview(myImageView)

        // ボタン.
        myButton.frame = CGRectMake(0,0,80,80)
        myButton.backgroundColor = UIColor.blackColor();
        myButton.layer.masksToBounds = true
        myButton.setTitle("ピンチ", forState: UIControlState.Normal)
        myButton.titleLabel?.font = UIFont.systemFontOfSize(UIFont.smallSystemFontSize())
        myButton.setTitleColor(UIColor.whiteColor(), forState: UIControlState.Normal)
        myButton.layer.cornerRadius = 40.0
        myButton.layer.position = CGPoint(x: self.view.frame.width/2, y:self.view.frame.height - 50)
        myButton.tag = 1
        myButton.addTarget(self, action: #selector(ViewController.onClickMyButton(_:)), forControlEvents: .TouchUpInside)

        // 背景色を黒.
        self.view.backgroundColor = UIColor.blackColor()

        // UIボタンをViewに追加
        self.view.addSubview(myButton);
    }

    /*
     ボタンイベント
     */
    func onClickMyButton(sender: UIButton){

        //カラーエフェクトを指定してCIFilterをインスタンス化
        let myPinchDistortionFilter = CIFilter(name: "CIPinchDistortion")

        // 中心をセット.
        myPinchDistortionFilter!.setValue(CIVector(CGPoint: CGPointMake(self.view.frame.width/2, self.view.frame.height/2)), forKey: "inputCenter")

        //イメージのセット
        myPinchDistortionFilter!.setValue(myInputImage, forKey: kCIInputImageKey)

        //フィルターを通した画像をアウトプット
        let myOutputImage : CIImage = myPinchDistortionFilter!.outputImage!

        // 再びUIViewにセット.
        myImageView.image = UIImage(CIImage: myOutputImage)

        // 再描画.
        myImageView.setNeedsDisplay()

    }

    override func didReceiveMemoryWarning() {
        super.didReceiveMemoryWarning()
    }
}