UIViewControllerで画面遷移する

ViewController.swift
//
// ViewController.swift
// UIKit015_4.0
//
// Created by akira on 2016/08/13.
// Copyright © 2018年 FaBo, Inc. All rights reserved.
//
import UIKit
class ViewController: UIViewController {
override func viewDidLoad() {
super.viewDidLoad()
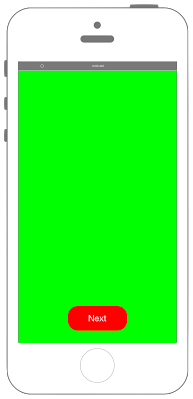
// 背景色をGreenに設定する.
self.view.backgroundColor = UIColor.green
// ボタンを生成する.
let nextButton: UIButton = UIButton(frame: CGRect(x: 0,y: 0, width: 120, height: 50))
nextButton.backgroundColor = UIColor.red
nextButton.layer.masksToBounds = true
nextButton.setTitle("Next", for: .normal)
nextButton.layer.cornerRadius = 20.0
nextButton.layer.position = CGPoint(x: self.view.bounds.width/2 , y:self.view.bounds.height-50)
nextButton.addTarget(self, action: #selector(onClickMyButton(sender:)), for: .touchUpInside)
// ボタンを追加する.
self.view.addSubview(nextButton);
}
/*
ボタンイベント.
*/
@objc internal func onClickMyButton(sender: UIButton){
// 遷移するViewを定義する.
let mySecondViewController: UIViewController = SecondViewController()
// アニメーションを設定する.
mySecondViewController.modalTransitionStyle = .partialCurl
// Viewの移動する.
self.present(mySecondViewController, animated: true, completion: nil)
}
override func didReceiveMemoryWarning() {
super.didReceiveMemoryWarning()
// Dispose of any resources that can be recreated.
}
}
//
//  ViewController.swift
//  UIKit015_3.0
//
//  Created by akira on 2016/08/13.
//  Copyright © 2016年 FaBo, Inc. All rights reserved.
//

import UIKit

class ViewController: UIViewController {

    override func viewDidLoad() {
        super.viewDidLoad()
        // 背景色をGreenに設定する.
        self.view.backgroundColor = UIColor.green

        // ボタンを生成する.
        let nextButton: UIButton = UIButton(frame: CGRect(x: 0,y: 0, width: 120, height: 50))
        nextButton.backgroundColor = UIColor.red
        nextButton.layer.masksToBounds = true
        nextButton.setTitle("Next", for: .normal)
        nextButton.layer.cornerRadius = 20.0
        nextButton.layer.position = CGPoint(x: self.view.bounds.width/2 , y:self.view.bounds.height-50)
        nextButton.addTarget(self, action: #selector(onClickMyButton(sender:)), for: .touchUpInside)

        // ボタンを追加する.
        self.view.addSubview(nextButton);
    }

    /*
     ボタンイベント.
     */
    internal func onClickMyButton(sender: UIButton){

        // 遷移するViewを定義する.
        let mySecondViewController: UIViewController = SecondViewController()

        // アニメーションを設定する.
        mySecondViewController.modalTransitionStyle = .partialCurl

        // Viewの移動する.
        self.present(mySecondViewController, animated: true, completion: nil)
    }


    override func didReceiveMemoryWarning() {
        super.didReceiveMemoryWarning()
        // Dispose of any resources that can be recreated.
    }


}
///
//  ViewController.swift
//  UIKit015
//
//  Copyright © 2016年 FaBo, Inc. All rights reserved.
//

import UIKit

class ViewController: UIViewController {

    override func viewDidLoad() {
        super.viewDidLoad()
        // 背景色をGreenに設定する.
        self.view.backgroundColor = UIColor.greenColor()

        // ボタンを生成する.
        let nextButton: UIButton = UIButton(frame: CGRectMake(0,0,120,50))
        nextButton.backgroundColor = UIColor.redColor();
        nextButton.layer.masksToBounds = true
        nextButton.setTitle("Next", forState: .Normal)
        nextButton.layer.cornerRadius = 20.0
        nextButton.layer.position = CGPoint(x: self.view.bounds.width/2 , y:self.view.bounds.height-50)
        nextButton.addTarget(self, action: #selector(onClickMyButton(_:)), forControlEvents: .TouchUpInside)

        // ボタンを追加する.
        self.view.addSubview(nextButton);
    }

    /*
     ボタンイベント.
     */
    internal func onClickMyButton(sender: UIButton){

        // 遷移するViewを定義する.
        let mySecondViewController: UIViewController = SecondViewController()

        // アニメーションを設定する.
        mySecondViewController.modalTransitionStyle = UIModalTransitionStyle.PartialCurl

        // Viewの移動する.
        self.presentViewController(mySecondViewController, animated: true, completion: nil)
    }


    override func didReceiveMemoryWarning() {
        super.didReceiveMemoryWarning()
        // Dispose of any resources that can be recreated.
    }


}
SecondViewController.swift
//
//  SecondViewController.swift
//  UIKit015
//
//  Copyright © 2018年 FaBo, Inc. All rights reserved.
//

import UIKit

class SecondViewController: UIViewController {

    override func viewDidLoad() {
        super.viewDidLoad()

        // 背景色を設定.
        self.view.backgroundColor = UIColor.blue

        // ボタンを作成.
        let backButton: UIButton = UIButton(frame: CGRect(x: 0, y: 0, width: 120, height: 50))
        backButton.backgroundColor = UIColor.red
        backButton.layer.masksToBounds = true
        backButton.setTitle("Back", for: .normal)
        backButton.layer.cornerRadius = 20.0
        backButton.layer.position = CGPoint(x: self.view.bounds.width/2 , y:self.view.bounds.height-50)
        backButton.addTarget(self, action: #selector(onClickMyButton(sender:)), for: .touchUpInside)
        self.view.addSubview(backButton);
    }

    /*
     ボタンイベント.
     */
    @objc internal func onClickMyButton(sender: UIButton){

        // 遷移するViewを定義.
        let myViewController: UIViewController = ViewController()

        // アニメーションを設定.
        myViewController.modalTransitionStyle = UIModalTransitionStyle.flipHorizontal

        // Viewの移動.
        self.present(myViewController, animated: true, completion: nil)
    }

    override func didReceiveMemoryWarning() {
        super.didReceiveMemoryWarning()
        // Dispose of any resources that can be recreated.
    }
}
//
//  SecondViewController.swift
//  UIKit015
//
//  Copyright © 2016年 FaBo, Inc. All rights reserved.
//

import UIKit

class SecondViewController: UIViewController {

    override func viewDidLoad() {
        super.viewDidLoad()

        // 背景色を設定.
        self.view.backgroundColor = UIColor.blueColor()

        // ボタンを作成.
        let backButton: UIButton = UIButton(frame: CGRectMake(0,0,120,50))
        backButton.backgroundColor = UIColor.redColor();
        backButton.layer.masksToBounds = true
        backButton.setTitle("Back", forState: .Normal)
        backButton.layer.cornerRadius = 20.0
        backButton.layer.position = CGPoint(x: self.view.bounds.width/2 , y:self.view.bounds.height-50)
        backButton.addTarget(self, action: #selector(onClickMyButton(_:)), forControlEvents: .TouchUpInside)
        self.view.addSubview(backButton);
    }

    /*
     ボタンイベント.
     */
    internal func onClickMyButton(sender: UIButton){

        // 遷移するViewを定義.
        let myViewController: UIViewController = ViewController()

        // アニメーションを設定.
        myViewController.modalTransitionStyle = UIModalTransitionStyle.FlipHorizontal

        // Viewの移動.
        self.presentViewController(myViewController, animated: true, completion: nil)
    }

    override func didReceiveMemoryWarning() {
        super.didReceiveMemoryWarning()
        // Dispose of any resources that can be recreated.
    }
}
3.xと4.xの差分
internal func onClickMyButton(sender: UIButton)に@objcを追加UIColor.blueColor()がUIColor.blueに変更UIButton(frame: CGRectMake(0,0,120,50))が、UIButton(frame: CGRect(x: 0, y: 0, width: 120, height: 50))に変更UIColor.redColor()がUIColor.redに変更setTitle("Back", forState: .Normal)が、setTitle("Back", for: .normal)に変更backButton.addTarget(self, action: #selector(onClickMyButton(_:)), forControlEvents: .TouchUpInside)が、backButton.addTarget(self, action: #selector(onClickMyButton(sender:)), for: .touchUpInside)に変更UIModalTransitionStyle.FlipHorizontalが、UIModalTransitionStyle.flipHorizontalに変更self.presentViewController(myViewController, animated: true, completion: nil)が、self.present(myViewController, animated: true, completion: nil)に変更
2.3と3.0の差分
- presentViewController()がpresent()に変更.
Reference
- UserNotifications