//
// ViewController.swift
// UIKit020_3.0
//
// Created by KimikoWatanabe on 2016/08/13.
// Copyright © 2016年 FaBo, Inc. All rights reserved.
//
import UIKit
class ViewController: UIViewController {
override func viewDidLoad() {
super.viewDidLoad()
// 背景を灰色に設定する.
self.view.backgroundColor = UIColor(red: 0.9, green: 0.9, blue: 0.9, alpha: 1.0)
// TextView生成する.
let myTextView: UITextView = UITextView(frame: CGRect(x:10, y:50, width:self.view.frame.width - 20, height:500))
// TextViewの背景を黃色に設定する.
myTextView.backgroundColor = UIColor(red: 0.9, green: 0.9, blue: 1, alpha: 1.0)
// 表示させるテキストを設定する.
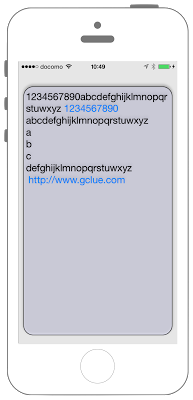
myTextView.text = "1234567890abcdefghijklmnopqrstuwxyz 1234567890 abcdefghijklmnopqrstuwxyz \na\nb\nc\ndefghijklmnopqrstuwxyz \n http://www.gclue.com\n"
// 角に丸みをつける.
myTextView.layer.masksToBounds = true
// 丸みのサイズを設定する.
myTextView.layer.cornerRadius = 20.0
// 枠線の太さを設定する.
myTextView.layer.borderWidth = 1
// 枠線の色を黒に設定する.
myTextView.layer.borderColor = UIColor.black.cgColor
// フォントの設定をする.
myTextView.font = UIFont.systemFont(ofSize: 20.0)
// フォントの色の設定をする.
myTextView.textColor = UIColor.black
// 左詰めの設定をする.
myTextView.textAlignment = NSTextAlignment.left
// リンク、日付などを自動的に検出してリンクに変換する.
myTextView.dataDetectorTypes = UIDataDetectorTypes.all
// 影の濃さを設定する.
myTextView.layer.shadowOpacity = 0.5
// テキストを編集不可にする.
myTextView.isEditable = false
// TextViewをViewに追加する.
self.view.addSubview(myTextView)
}
override func didReceiveMemoryWarning() {
super.didReceiveMemoryWarning()
}
}
//
//  ViewController.swift
//  UIKit020_2.3
//
//  Created by KimikoWatanabe on 2016/08/16.
//  Copyright © 2016年 FaBo, Inc. All rights reserved.
//

import UIKit

class ViewController: UIViewController {

    override func viewDidLoad() {
        super.viewDidLoad()

        // 背景を灰色に設定する.
        self.view.backgroundColor = UIColor(red: 0.9, green: 0.9, blue: 0.9, alpha: 1.0)

        // TextView生成する.
        let myTextView: UITextView = UITextView(frame: CGRectMake(10, 50, self.view.frame.width - 20, 500))

        // TextViewの背景を黃色に設定する.
        myTextView.backgroundColor = UIColor(red: 0.9, green: 0.9, blue: 1, alpha: 1.0)

        // 表示させるテキストを設定する.
        myTextView.text = "1234567890abcdefghijklmnopqrstuwxyz 1234567890 abcdefghijklmnopqrstuwxyz \na\nb\nc\ndefghijklmnopqrstuwxyz \n http://www.gclue.com\n"

        // 角に丸みをつける.
        myTextView.layer.masksToBounds = true

        // 丸みのサイズを設定する.
        myTextView.layer.cornerRadius = 20.0

        // 枠線の太さを設定する.
        myTextView.layer.borderWidth = 1

        // 枠線の色を黒に設定する.
        myTextView.layer.borderColor = UIColor.blackColor().CGColor

        // フォントの設定をする.
        myTextView.font = UIFont.systemFontOfSize(CGFloat(20))

        // フォントの色の設定をする.
        myTextView.textColor = UIColor.blackColor()

        // 左詰めの設定をする.
        myTextView.textAlignment = NSTextAlignment.Left

        // リンク、日付などを自動的に検出してリンクに変換する.
        myTextView.dataDetectorTypes = UIDataDetectorTypes.All

        // 影の濃さを設定する.
        myTextView.layer.shadowOpacity = 0.5

        // テキストを編集不可にする.
        myTextView.editable = false

        // TextViewをViewに追加する.
        self.view.addSubview(myTextView)
    }

    override func didReceiveMemoryWarning() {
        super.didReceiveMemoryWarning()
    }
}