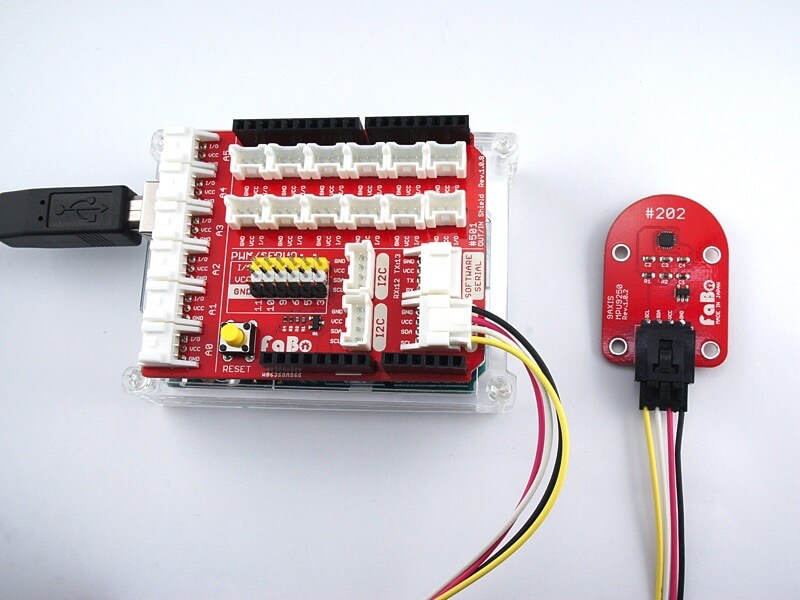
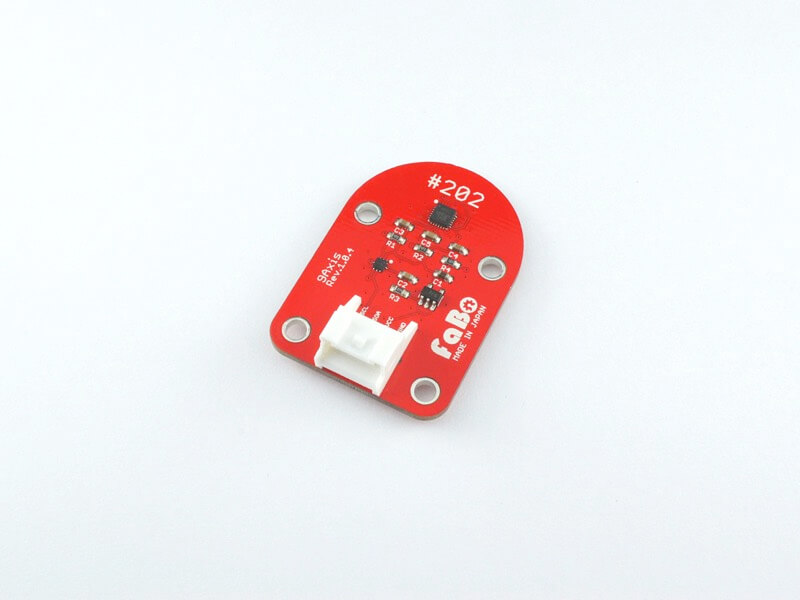
#202 9Axis I2C Brick
Overview
1チップで3軸加速度、3軸ジャイロ、3軸コンパスを取得できるセンサを使用したBrickです。
I2Cでデータを取得できます。
接続
I2Cコネクタへ接続します。
Arduino
Raspberry Pi
MPU-9250 Datasheet
Register
MPU-9250は、三軸加速度、ジャイロ用とコンパス用の2つのI2C Slave Addressがあります。
MPU-9250(三軸加速度、ジャイロ)
|Slave Address|
|--|--|
|0x68|
AK8963(コンパス)
|Slave Address |
|--|--|
|0x0C|
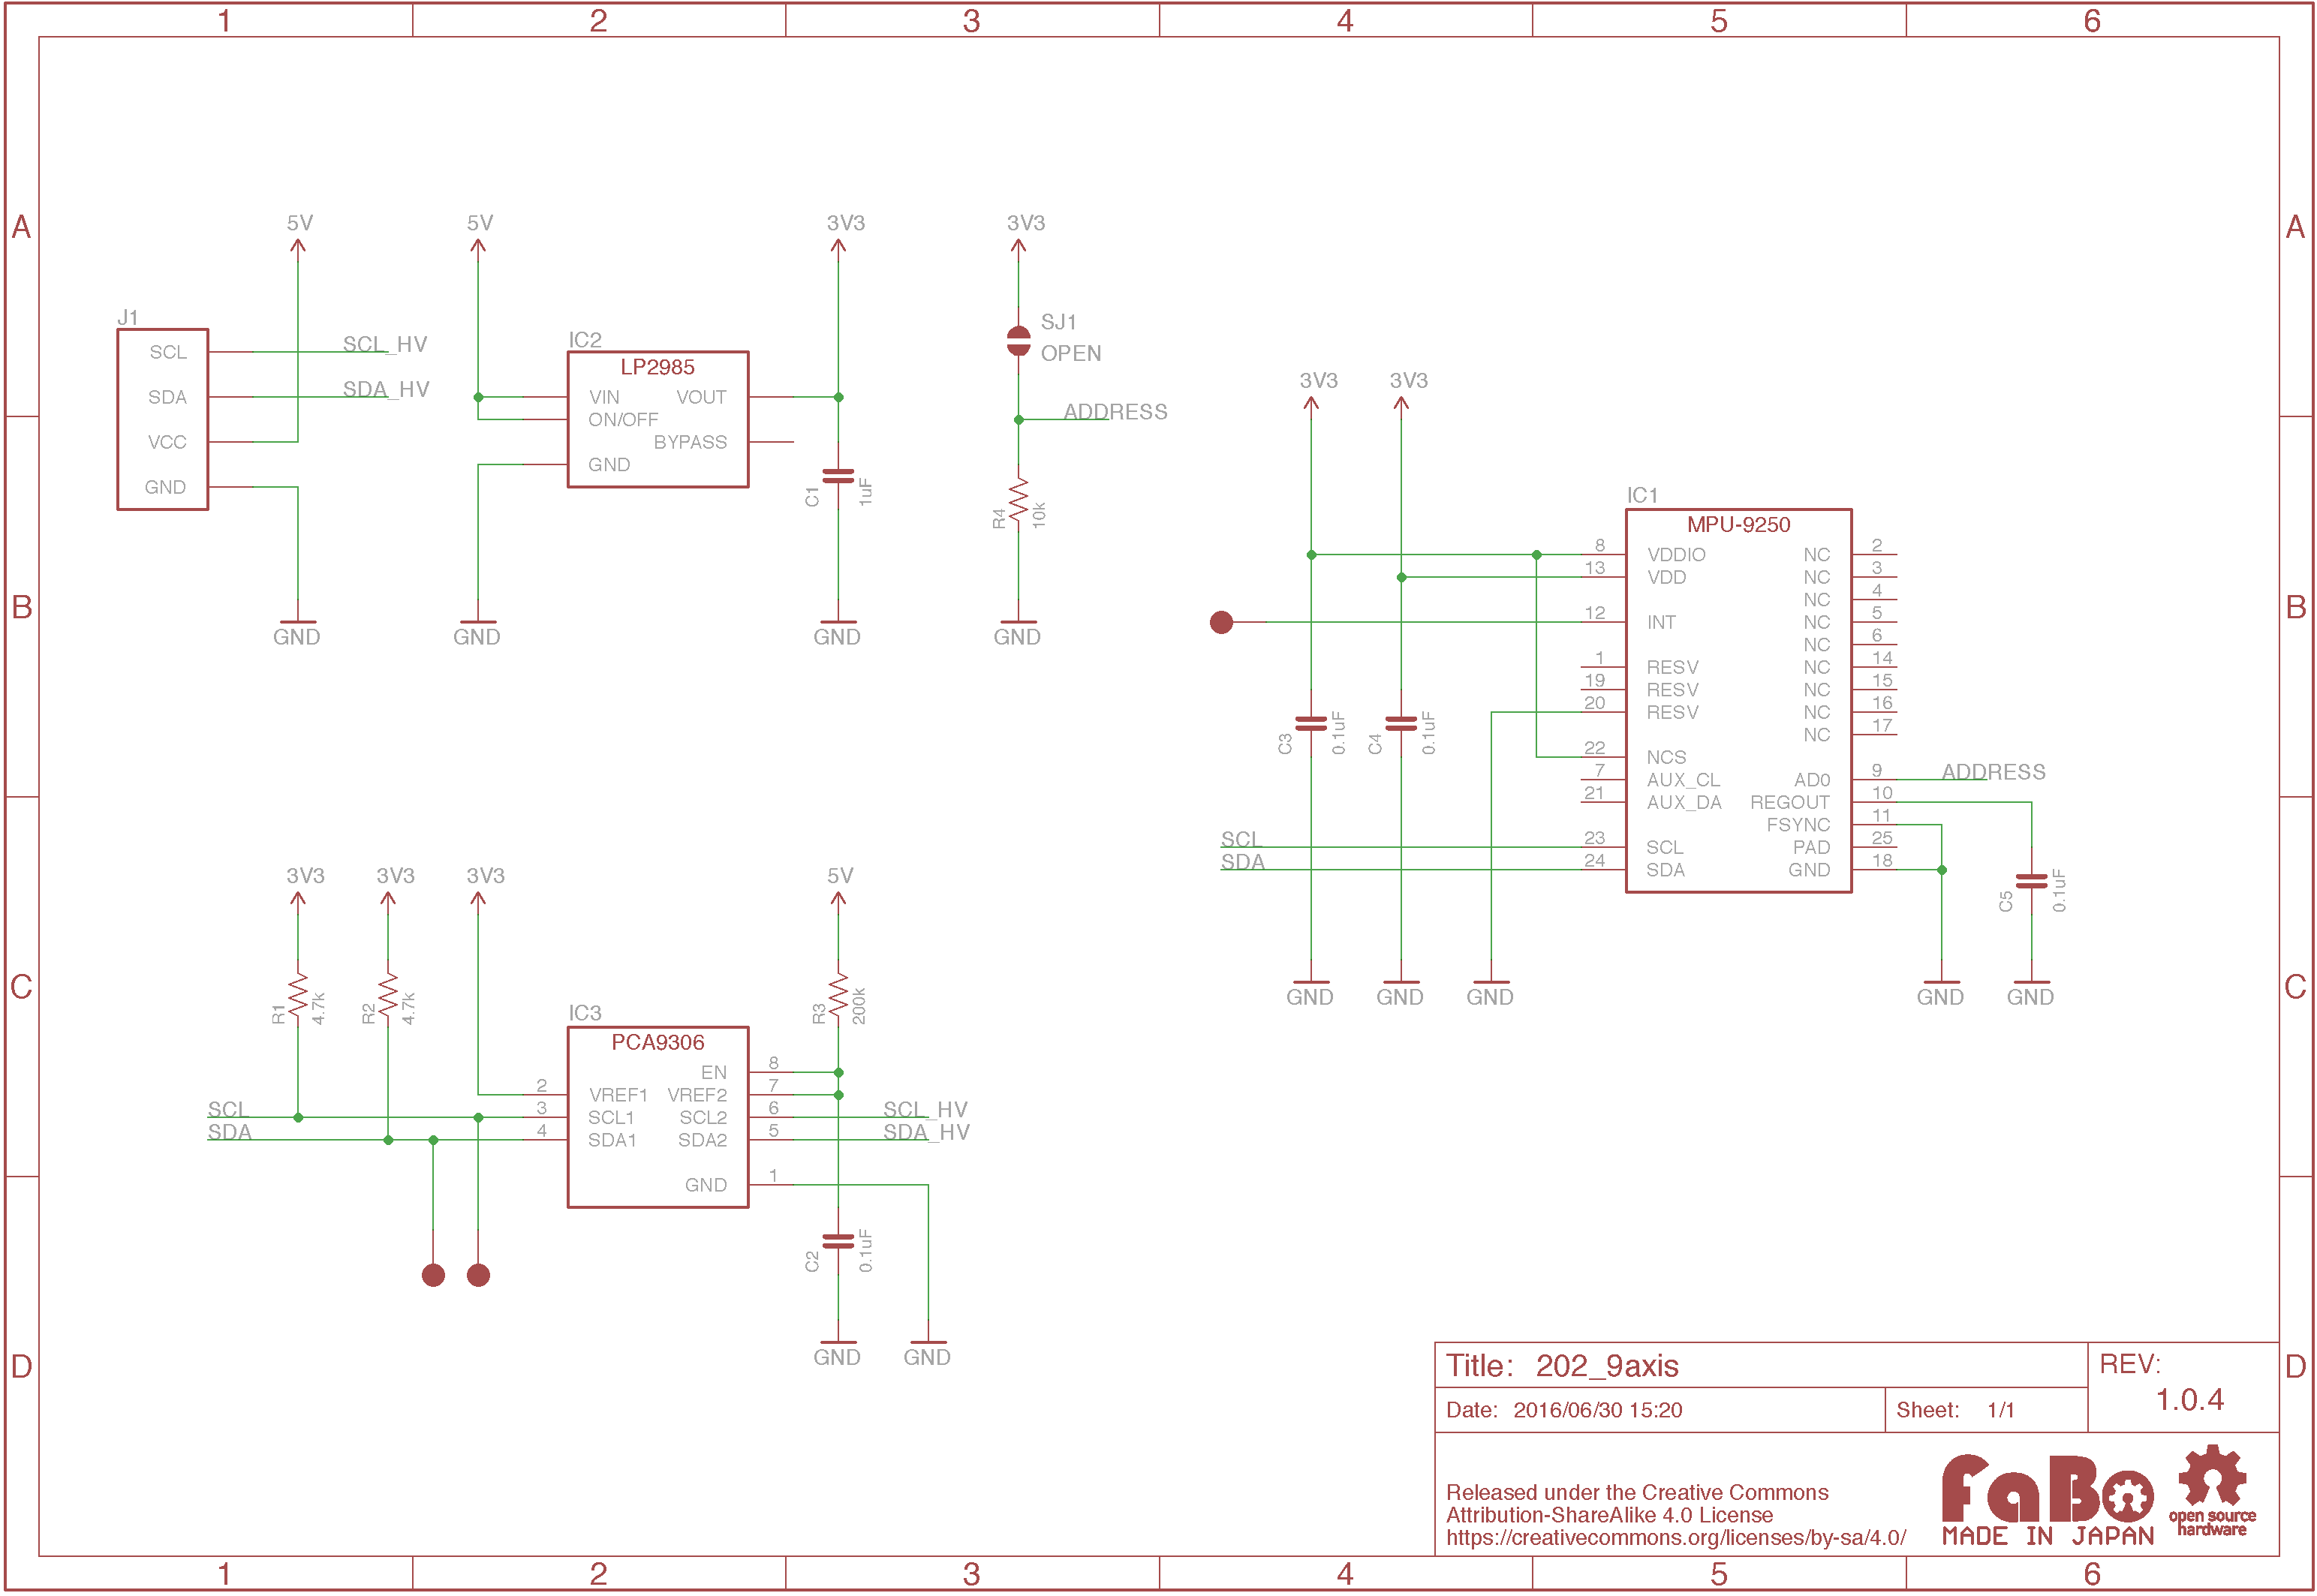
回路図
Library
pip install FaBo9Axis_MPU9250
Sample Code
for Raspberry Pi
I2Cコネクタに接続した9Axis I2C Brickより3軸加速度、3軸ジャイロ、3軸コンパス情報を取得し、コンソールに出力します。
Python 1
2
3
4
5
6
7
8
9
10
11
12
13
14
15
16
17
18
19
20
21
22
23
24
25
26
27
28
29
30
31
32
33
34
35
36
37
38
39
40 # coding: utf-8
## @package faboMPU9250
# This is a library for the FaBo 9AXIS I2C Brick.
#
# http://fabo.io/202.html
#
# Released under APACHE LICENSE, VERSION 2.0
#
# http://www.apache.org/licenses/
#
# FaBo <info@fabo.io>
import FaBo9Axis_MPU9250
import time
import sys
mpu9250 = FaBo9Axis_MPU9250 . MPU9250 ()
try :
while True :
accel = mpu9250 . readAccel ()
print " ax = " , ( accel [ 'x' ] )
print " ay = " , ( accel [ 'y' ] )
print " az = " , ( accel [ 'z' ] )
gyro = mpu9250 . readGyro ()
print " gx = " , ( gyro [ 'x' ] )
print " gy = " , ( gyro [ 'y' ] )
print " gz = " , ( gyro [ 'z' ] )
mag = mpu9250 . readMagnet ()
print " mx = " , ( mag [ 'x' ] )
print " my = " , ( mag [ 'y' ] )
print " mz = " , ( mag [ 'z' ] )
print
time . sleep ( 0.5 )
except KeyboardInterrupt :
sys . exit ()
Python でデータの取得できる範囲を変更できます
gfs : 限界(dps)
afs : 限界(g)
mpu9250 . configMPU9250 ( 0x00 , 0x00 )
mpu9250 . configMPU9250 ( 0x00 , 0x01 )
mpu9250 . configMPU9250 ( 0x00 , 0x02 )
mpu9250 . configMPU9250 ( 0x00 , 0x03 )
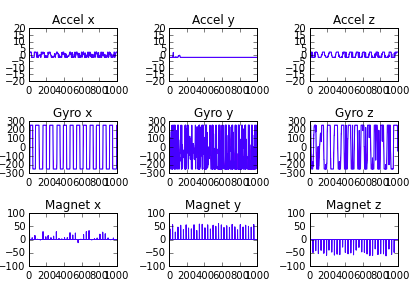
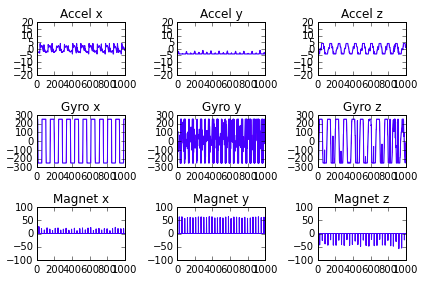
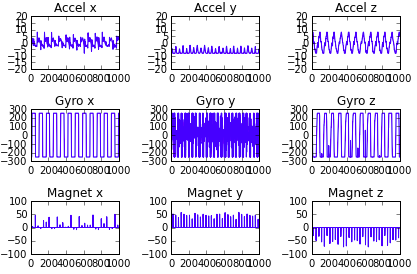
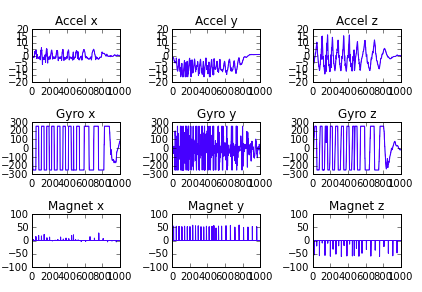
ボタンが押された時の前後0.5秒間のデータをグラフにして出力します。
 1
 2
 3
 4
 5
 6
 7
 8
 9
10
11
12
13
14
15
16
17
18
19
20
21
22
23
24
25
26
27
28
29
30
31
32
33
34
35
36
37
38
39
40
41
42
43
44
45
46
47
48
49
50
51 #coding: utf-8
import matplotlib.pyplot as plt
import numpy as np
import FaBo9Axis_MPU9250
import time
import sys
import RPi.GPIO as GPIO
% matplotlib inline
mpu9250 = FaBo9Axis_MPU9250 . MPU9250 ()
i = 0
t = 0
co = 0
value = []
data = []
title = [ "Accel x" , "Accel y" , "Accel z" , "Gyro x" , "Gyro y" , "Gyro z" , "Magnet x" , "Magnet y" , "Magnet z" ]
GPIO . setwarnings ( False )
GPIO . setmode ( GPIO . BCM )
GPIO . setup ( 5 , GPIO . IN )
def plotgr ():
array = np . array ( data )
for j in range ( 0 , 9 ):
plt . subplot ( 3 , 3 , j + 1 )
plt . title ( title [ j ])
plt . plot ( array [:, j ])
plt . tight_layout ()
plt . show ()
try :
while True :
t += 1
if co > 0 :
co += 1
a = mpu9250 . readAccel ()
g = mpu9250 . readGyro ()
m = mpu9250 . readMagnet ()
value = ( a [ 'x' ], a [ 'y' ], a [ 'z' ], g [ 'x' ], g [ 'y' ], g [ 'z' ], m [ 'x' ], m [ 'y' ], m [ 'z' ])
data . append ( value )
if len ( data ) == 12 :
del data [ 0 ]
if GPIO . input ( 5 ):
if co == 0 :
co = 1
if co == 6 :
co = 0
plotgr ()
time . sleep ( 0.1 )
except KeyboardInterrupt :
sys . exit ()
構成Parts
GitHub
https://github.com/FaBoPlatform/FaBo/tree/master/202_9axis